Squarespace 7.1 - 2 Methods to swap out logos - colour sections and specific pages
The problem
In Squarespace 7.1, you can sometimes find the need for a different main site logo to suit the section or page. The main issue that i have come across is when you have set a main logo that reverses on a photo background for the home page header, but your site has a blog page section that requires a white header. So your white reversing main logo doesn’t suit the white blog header.
Ideally you would to be able to set a coloured header section background for individual blog pages in 7.1. But, at the moment, this seems to be an issue Squarespace are not fixing.
The second situation that you may need a different logo, is when you want a different logo for a specific page only. Maybe because you want an icon only or, as i recently found, i wanted to colour the logo to suit a colour scheme for a specific page.
There is different CSS method to suit each issue.
METHOD 1
Swapping out the main logo in specific colour section themes
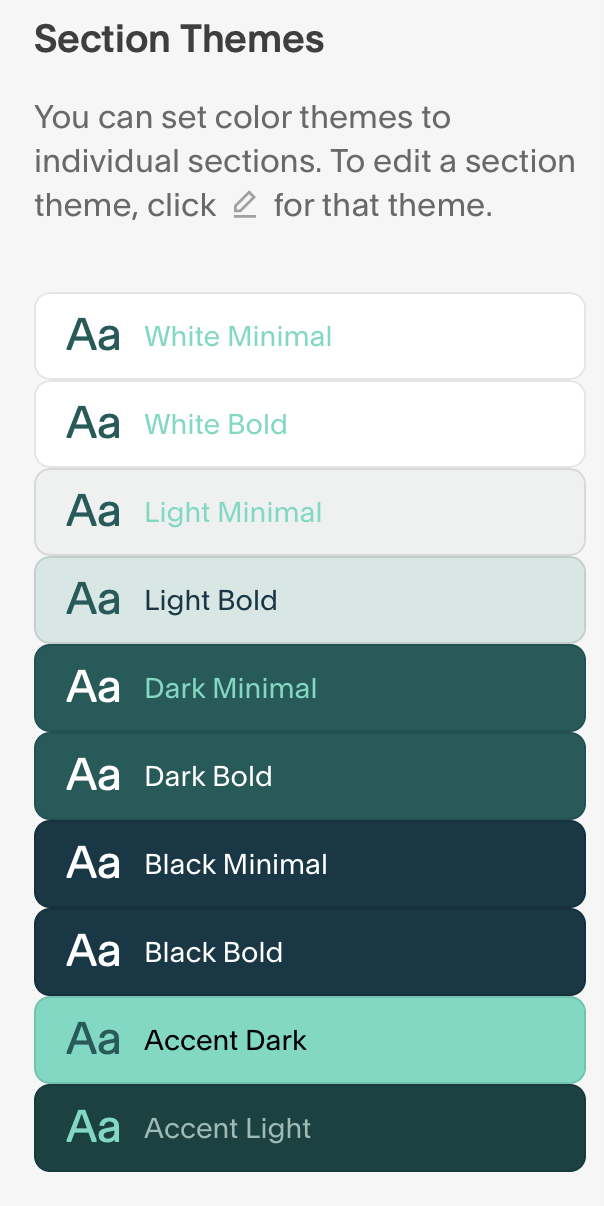
Squarespace 7.1 has a number colour spaces that can be applied to each section of a page. These are automatically generated but can be tweaked.
Each colour section has a ‘class’ that can be targeted by CSS and a logo swap can be set up to work with that particular class.
white minimal .white
white bold .white-bold
light minimal .light
light bold .light-bold
dark minimal .dark
dark bold .dark-bold
black minimal .black
black bold .black-bold
accent dark .bright
accent light .bright-inverse
NOTE: Whatever colour section you have selected in the first section of any page will apply to the header logo.
In order to Swap out the main logo, a new logo file has be imported to the Squarespace file repository using ‘manage custom files’.

1. In the Custom CSS section click on ‘Manage Custom Files’
2. Upload your new logo - click on ‘Add images or fonts’ and add your logo.
3. Paste the following code into ‘Custom CSS’
Replacing the colour section classes you wish to target (in Red) as required using the list above, and;
Replacing the image URL (in Blue)
//New Logo on These Sections
.white,.light {
&.header .header-title-logo a
{ content: url (" https://static1.squarespace.com/static/6017b6087afdae55cedc048a/t/6025bcb88a883f1c68c67121/1613085881439/Triffid_pos2.png ");
}}
4. To replace the image URL, select the full URL in the Custom CSS panel (blue text only) and delete, but leave your cursor in this spot between quotation marks. Then open ‘manage custom files’ and click on your replacement uploaded logo. This will insert the new image URL for you where your cursor is (between the quotations).
5. Once you save, this will place your new logo in the colour section classes you have targeted. eg. White minimal and Light Minimal in this case.
NOTE: It may take a couple of refreshes to see it.
METHOD 2
Swapping out the main logo on a single specific page
This method has some similarities to the first in that you need to upload your new logo replacement into the Squarespace file repository. Follow steps 1 & 2 above to get a new logo into Squarespace.
Where it differs is that CSS is applied to the advanced section of a page. (not Pasted into ‘Custom CSS’). But you will need to copy the logo URL from Custom CSS.
1. After uploading your new logo, place your cursor in the Custom CSS panel and then open ‘Manage Custom Files’ and click on your replacement uploaded logo. This will insert the new image URL for you where your cursor is. Cut this URL and put it into a note for later use.
2. Paste the code below into the advanced section of your specific page settings. ( So the code only acts on this page)
<style> .header-title-logo a{ content: url("https://static1.squarespace.com/static/6017b6087afdae55cedc048a/t/6025bdd99957e36d101b23c2/1613086170315/Triffid_sb.png");}
</style>
Click on the cog icon to access the settings for a page and then select advanced. This is where you paste the code.
3. Replace the URL in the code with the one you put in a note. Inserting it between the quotation marks.
4. Save. This will place your new logo on this page only.